智能体平台操作指南
本文整合了智能公元平台对智能体开放的三类接入 API,以及配套的设备控制能力(MCP 与 coze 插件)。文档按照“整体概览 → API 详情 → 工具拓展”的顺序组织,便于快速定位所需信息。
1. 接入概览
1.1 适用场景
- 已有自研大模型或完整智能体服务,需在设备端落地。
- 需要通过平台提供的“自定义”智能体配置选项,将外部服务通过 API 注入到设备。
- 希望通过平台能力扩展语音对话、文本对话、TTS 生成或设备控制等功能。
1.2 接入方式速览
| 接入方式 | 连接协议 | 主要能力 | 典型场景 |
|---|---|---|---|
| HTTP 大模型服务 | HTTP + SSE | 自定义大模型推理,平台默认 ASR/TTS | 只需模型输出文本,再由设备完成语音播报 |
| 双向流式语音对话 | WebSocket | 语音上行 + 文本/音频下行的全链路对话 | 需要自定义语音对话引擎或完整对话服务 |
| 大模型 + TTS 服务 | WebSocket | 纯文本问题输入,平台回传文本 + TTS 音频 | 需自定义文本大模型与语音合成,实现多轮播报 |
2. HTTP 大模型服务参考 API
适用于已准备好 ASR→LLM→TTS 流程中“LLM”环节的场景。设备默认使用平台 ASR 和 TTS,只需提供大模型推理接口即可。
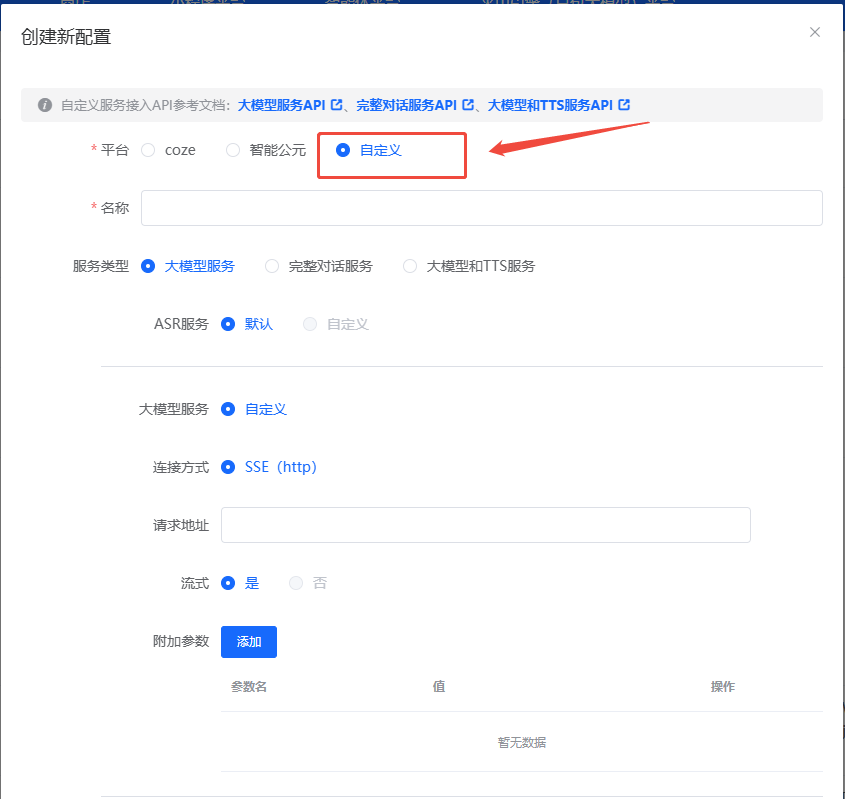
2.1 配置要点
- ASR 服务:可选“默认/自定义”,默认表示继续沿用平台配置。
- 大模型服务:
- 连接方式:当前支持 SSE (http)。
- 请求地址:填写模型推理 URL。
- 流式:建议开启,以便实时回传生成内容。
- 附加参数:可在配置界面动态添加,平台会写入请求体。
- TTS 服务:可选“默认/自定义”,默认由平台完成文本转语音。
2.2 接口说明
- 请求方式:
POST - 示例 URL:
https://test/api/v1/chat - 必填 Header:
Content-Type: application/json
请求体字段
| 参数名 | 类型 | 说明 | 是否必填 |
|---|---|---|---|
| deviceId | String | 设备唯一 ID | ✓ |
| question | String | 用户提问文本 | ✓ |
| stream | Boolean | 是否使用 SSE 流式返回 | ✓ |
| xxx | Object | 自定义附加参数 | ✗ |
请求示例
流式返回示例(SSE)
data:{"code":0,"message":"","data":{"answer":"我","id":"12341231"}}

data:{"code":0,"message":"","data":{"answer":"是","id":"12341231"}}

data:{"code":0,"message":"","data":{"answer":"小智","id":"12341231"}}

data:{"code":0,"message":"","data":{"answer":"有什么","id":"12341231"}}

data:{"code":0,"message":"","data":{"answer":"可以","id":"12341231"}}

data:{"code":0,"message":"","data":{"answer":"帮您","id":"12341231"}}

data:"[DONE]"
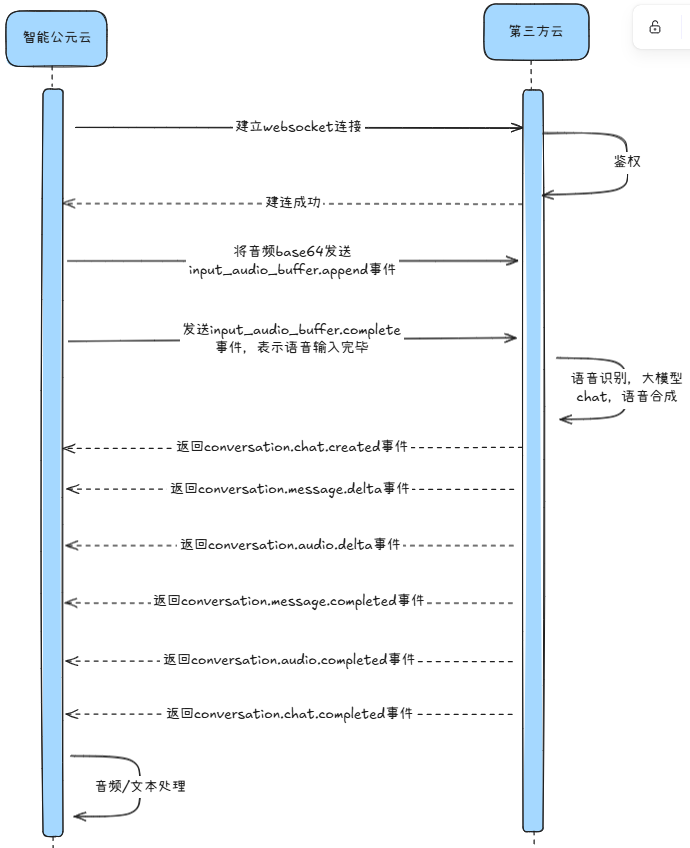
3. 完整对话服务参考 API(双向流式语音 WebSocket)
适用于自研了“语音识别 + 多模态推理 + 语音合成”能力的伙伴,通过 WebSocket 建立长连接,实现语音上/下行的实时对话。
3.1 接口特性
- 通信协议:
wss - 输入输出:可自定义语音编码,音频片段通过 Base64 传输。
- 附加参数:在建连 URL 的 Query 中透传。
3.2 时序
3.3 建连信息
- 示例 URL:
wss://test/api/v1/chat - Query 参数:
| 参数名 | 类型 | 说明 | 是否必填 |
|---|---|---|---|
| deviceId | String | 设备唯一 ID | ✓ |
| xxx | Object | 业务所需的附加参数 | ✗ |
示例:wss://test/api/v1/chat?deviceId=12345678
3.4 上行事件(客户端 → 服务端)
1) 流式上传音频片段 input_audio_buffer.append
| 字段 | 类型 | 说明 |
|---|---|---|
| id | String | 客户端生成的事件 ID |
| event_type | String | 固定为 input_audio_buffer.append |
| data.delta | String | Base64 编码的音频片段 |
{
  "id": "event_id",
  "event_type": "input_audio_buffer.append",
  "data": {
    "delta": "base64EncodedAudioDelta"
  }
}
2) 提交音频缓冲区 input_audio_buffer.complete
| 字段 | 类型 | 说明 |
|---|---|---|
| id | String | 客户端生成的事件 ID |
| event_type | String | 固定为 input_audio_buffer.complete |
3) 清除缓冲区音频 input_audio_buffer.clear
| 字段 | 类型 | 说明 |
|---|---|---|
| id | String | 客户端生成的事件 ID |
| event_type | String | 固定为 input_audio_buffer.clear |
4) 打断智能体输出 conversation.chat.cancel
| 字段 | 类型 | 说明 |
|---|---|---|
| id | String | 客户端生成的事件 ID |
| event_type | String | 固定为 conversation.chat.cancel |
3.5 下行事件(服务端 → 客户端)
1) 建立连接 chat.created
| 字段 | 类型 | 说明 |
|---|---|---|
| id | String | 服务端事件 ID |
| event_type | String | chat.created |
| detail.logid | String | 请求日志 ID |
{
  "id": "7446668538246561xxxx",
  "event_type": "chat.created",
  "detail": {
    "logid": "20241210152726467C48D89D6DB2F3***"
  }
}
2) 对话开始 conversation.chat.created
| 字段 | 类型 | 说明 |
|---|---|---|
| id | String | 服务端事件 ID |
| event_type | String | conversation.chat.created |
| data.id | String | 对话 ID |
| data.conversation_id | String | 会话 ID |
| detail.logid | String | 日志 ID |
{
  "id": "744666853824656xxx",
  "event_type": "conversation.chat.created",
  "data": {
    "id": "123",
    "conversation_id": "123"
  },
  "detail": {
    "logid": "20241210152726467C48D89D6DB2F3***"
  }
}
3) 文本增量 conversation.message.delta
| 字段 | 类型 | 说明 |
|---|---|---|
| id | String | 事件 ID |
| event_type | String | conversation.message.delta |
| data.content | String | 文本内容 |
| data.type | String | 固定 answer |
| data.conversation_id | String | 会话 ID |
{
  "id": "event_1",
  "event_type": "conversation.message.delta",
  "data": {
    "id": "msg_006",
    "conversation_id": "123",
    "type": "answer",
    "content": "你好你好"
  },
  "detail": {
    "logid": "20241210152726467C48D89D6DB2F3***"
  }
}
4) 语音增量 conversation.audio.delta
| 字段 | 类型 | 说明 |
|---|---|---|
| id | String | 事件 ID |
| data.content | String | Base64 音频片段 |
| data.type | String | answer |
{
  "id": "event_1",
  "event_type": "conversation.audio.delta",
  "data": {
    "id": "msg_006",
    "type": "answer",
    "content": "base64audio",
    "conversation_id": "123"
  },
  "detail": {
    "logid": "20241210152726467C48D89D6DB2F3***"
  }
}
5) 文本完成 conversation.message.completed
{
  "id": "event_1",
  "event_type": "conversation.message.completed",
  "data": {
    "id": "msg_002",
    "conversation_id": "123"
  },
  "detail": {
    "logid": "20241210152726467C48D89D6DB2F3***"
  }
}
6) 语音完成 conversation.audio.completed
{
  "id": "event_1",
  "event_type": "conversation.audio.completed",
  "data": {
    "id": "msg_002",
    "conversation_id": "123"
  },
  "detail": {
    "logid": "20241210152726467C48D89D6DB2F3***"
  }
}
7) 对话完成 conversation.chat.completed
{
  "id": "event_id",
  "event_type": "conversation.chat.completed",
  "data": {
    "id": "123",
    "conversation_id": "123"
  },
  "detail": {
    "logid": "20241210152726467C48D89D6DB2F3***"
  }
}
8) 对话失败 conversation.chat.failed
| 字段 | 类型 | 说明 |
|---|---|---|
| data.last_error.code | Integer | 错误码(0 表示成功) |
| data.last_error.msg | String | 错误描述 |
{
  "id": "event_1",
  "event_type": "conversation.chat.failed",
  "data": {
    "id": "123",
    "conversation_id": "123",
    "last_error": {
      "code": 1,
      "msg": "发生异常"
    }
  },
  "detail": {
    "logid": "20241210152726467C48D89D6DB2F3***"
  }
}
9) 错误事件 error
{
  "id": "event_1",
  "event_type": "error",
  "data": {
    "code": 1,
    "msg": "发生异常"
  },
  "detail": {
    "logid": "20241210152726467C48D89D6DB2F3***"
  }
}
10) 流式音频提交完成 input_audio_buffer.completed
{
  "id": "event_id",
  "event_type": "input_audio_buffer.completed",
  "detail": {
    "logid": "20241210152726467C48D89D6DB2F3***"
  }
}
11) 缓冲区已清除 input_audio_buffer.cleared
{
  "id": "event_id",
  "event_type": "input_audio_buffer.cleared",
  "detail": {
    "logid": "20241210152726467C48D89D6DB2F3***"
  }
}
12) 输出被中断 conversation.chat.canceled
{
  "id": "event_id",
  "event_type": "conversation.chat.canceled",
  "detail": {
    "logid": "20241210152726467C48D89D6DB2F3***"
  }
}
4. 大模型 + TTS 服务参考 API(文本输入 WebSocket)
该模式通过 WebSocket 发送文本问题,并接收文本结果与 TTS 音频,适合纯文本问题、由接入方自定义语音合成的场景。
4.1 时序
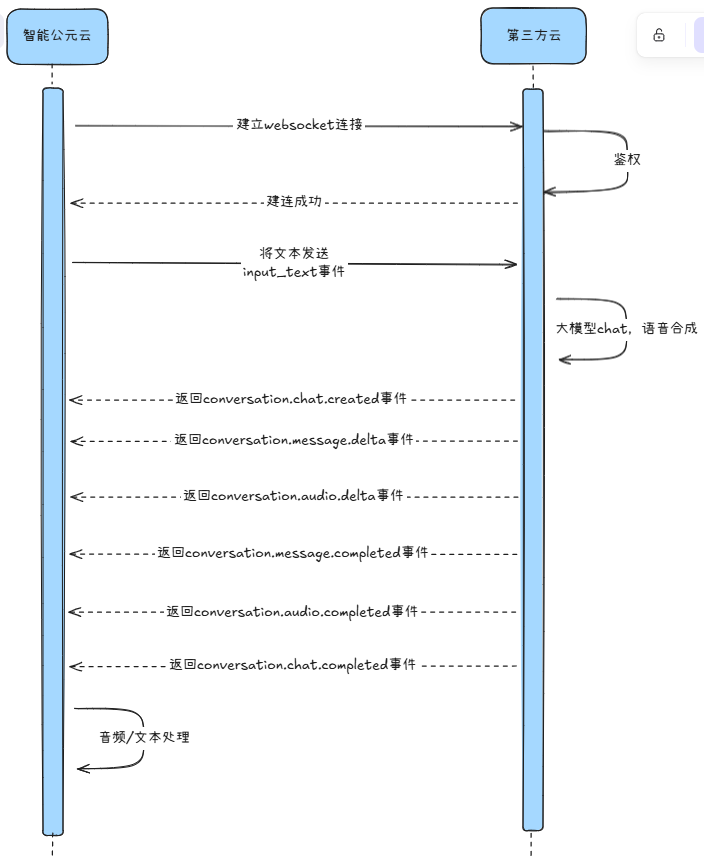
4.2 建连信息
- 示例 URL:
wss://test/api/v1/chat - Query 参数同上,需包含
deviceId,可附加自定义参数。
4.3 上行事件
1) 提交文本 input_text
| 字段 | 类型 | 说明 |
|---|---|---|
| id | String | 事件 ID |
| event_type | String | 固定 input_text |
| deviceId | String | 设备 ID |
| question | String | 文本问题 |
| stream | Boolean | 是否流式返回 |
| xxx | Object | 自定义参数 |
{
  "id": "event_id",
  "event_type": "input_text",
  "deviceId": "12345678",
  "question": "你是谁?",
  "stream": true
}
2) 打断输出 conversation.chat.cancel
结构与语音方案一致。
4.4 下行事件
与语音方案一致,包括 chat.created、conversation.chat.created、conversation.message.delta、conversation.audio.delta、conversation.message.completed、conversation.audio.completed、conversation.chat.completed、conversation.chat.failed、error、conversation.chat.canceled 等。示例结构可参考第 3 章,对应字段含义保持一致。
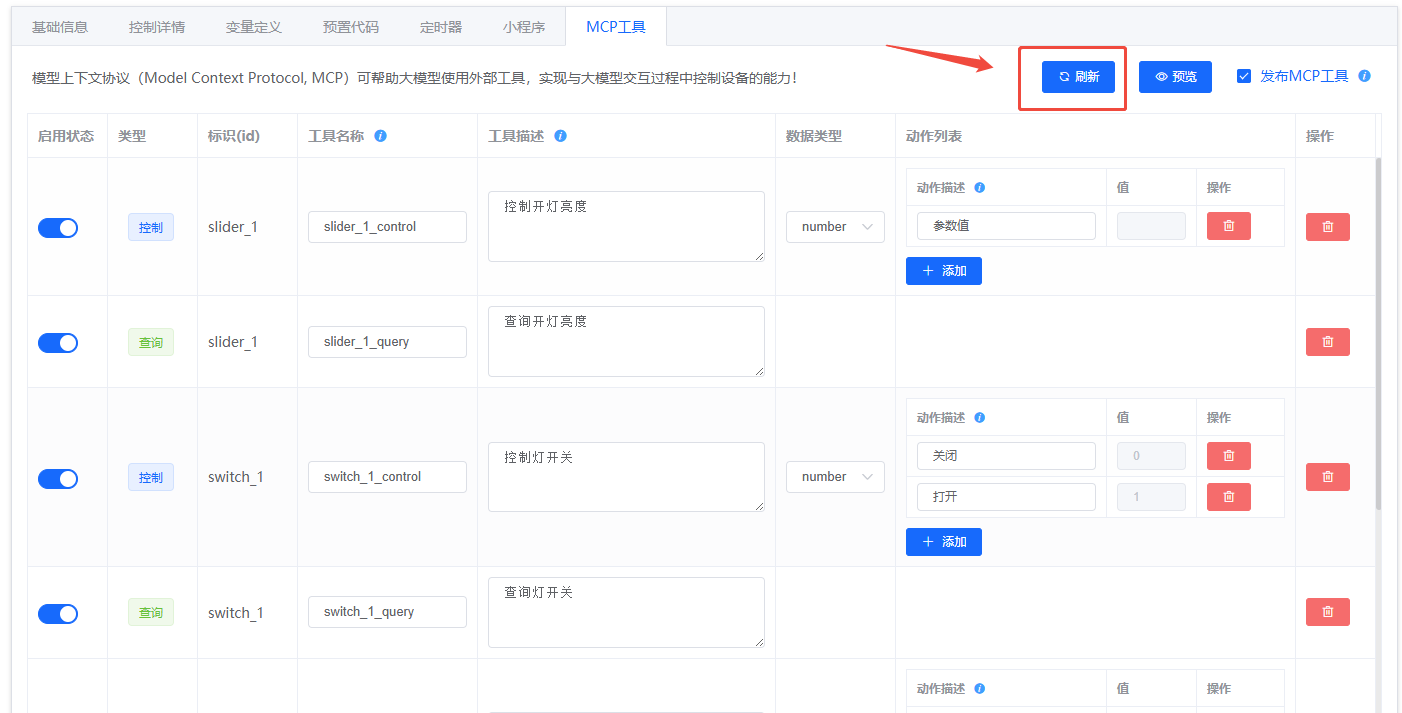
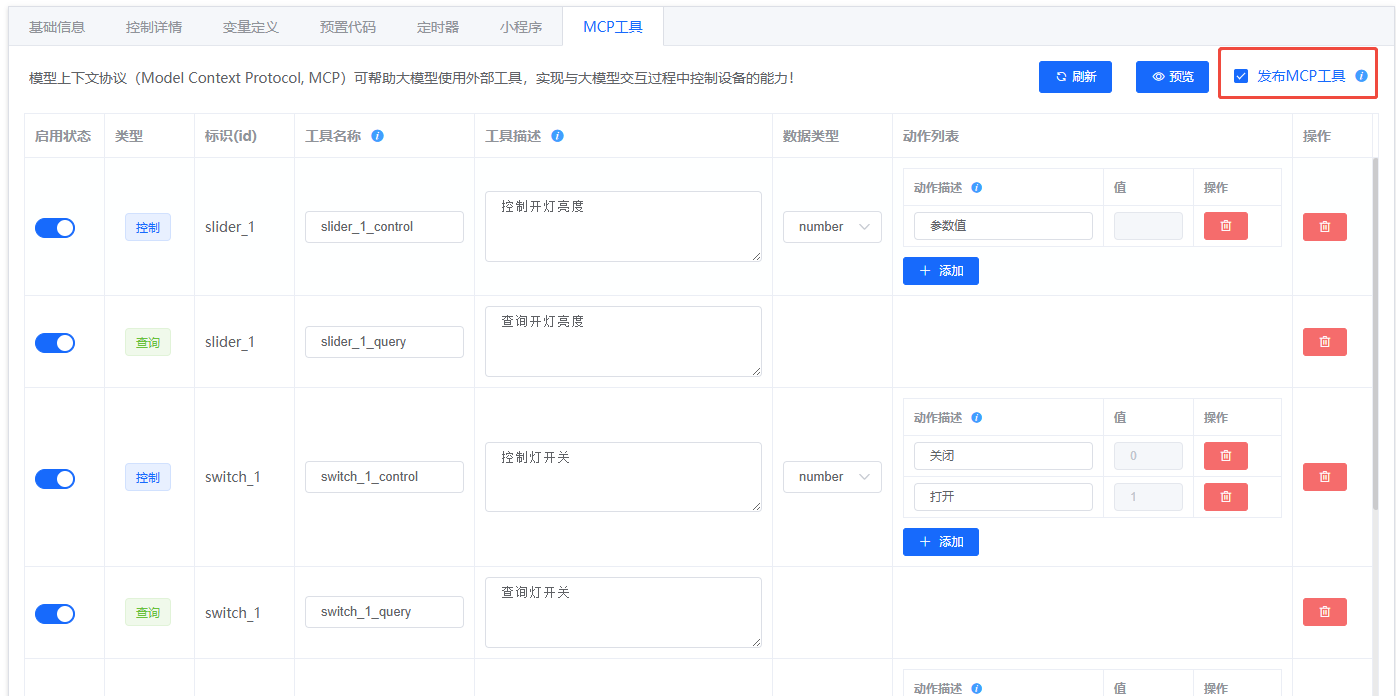
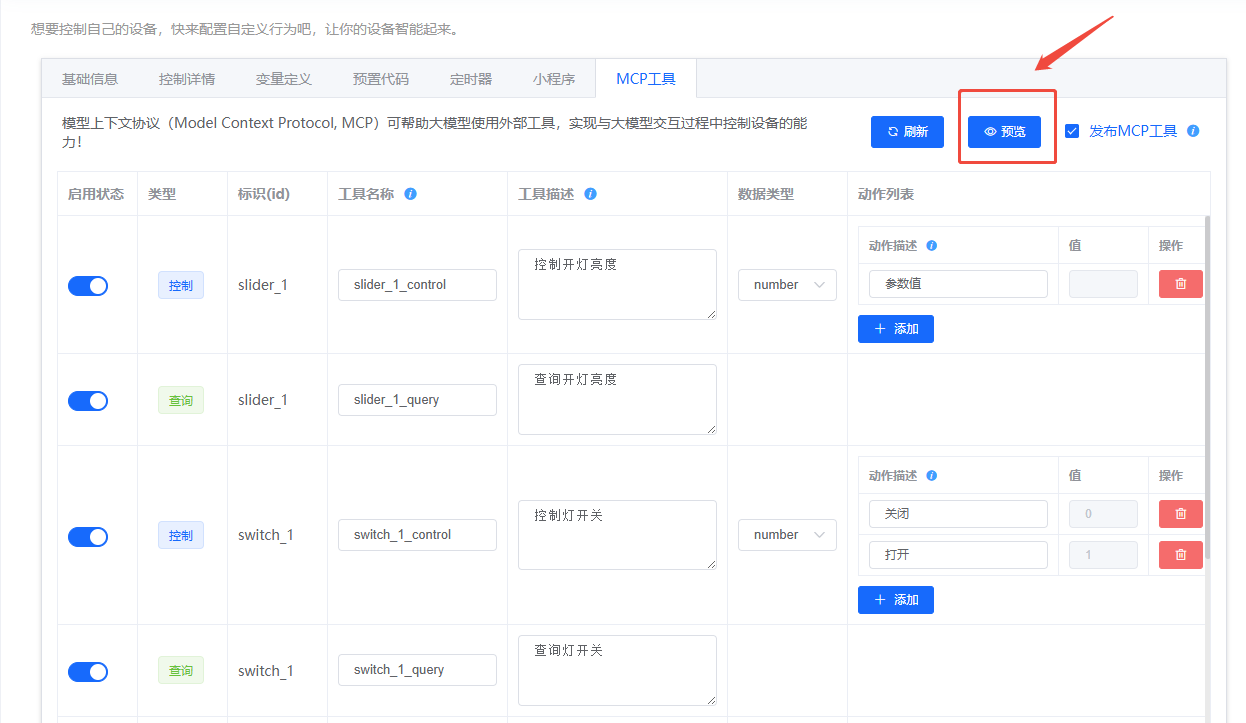
5. MCP(Model Context Protocol)设备控制
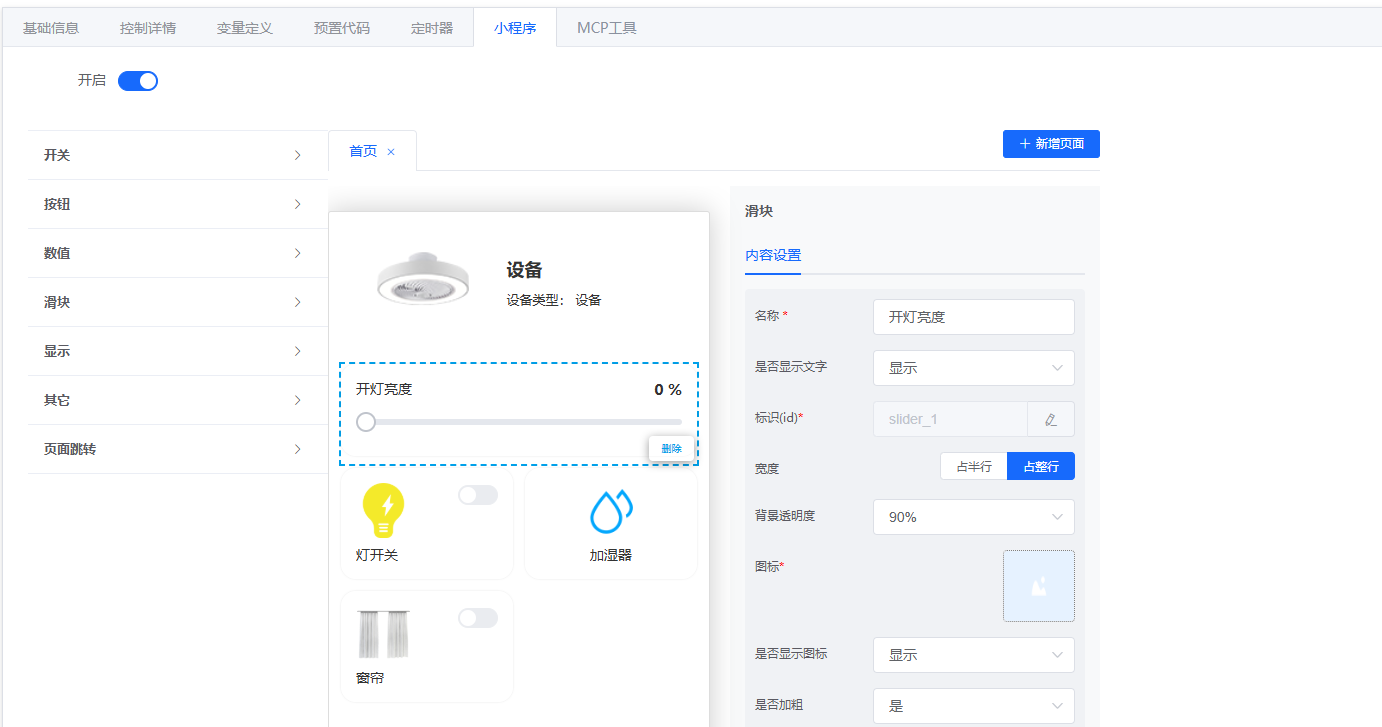
MCP 让大模型能够使用平台生成的外部工具,实现对设备控件的查询与控制。
5.1 操作步骤
- 配置控件:在小程序中配置滑块、开关、按钮等控件(例如调节灯光亮度、控制灯/加湿器/窗帘等)。
- 生成工具:切换到“MCP 工具”菜单,点击“刷新”生成与控件对应的工具。
- 补充描述:每个工具需填写清晰的名称与描述,区分“控制”和“查询”类型,便于大模型理解。
- 发布工具:版本发布前勾选“发布 MCP 工具”。
- 固件验证:将生成的固件烧录到设备,使用平台提供的“体验版智能体”即可在对话中调用 MCP 控制设备。
5.2 示例界面
- 控件配置示例:
- 工具生成示例:
- 发布确认:
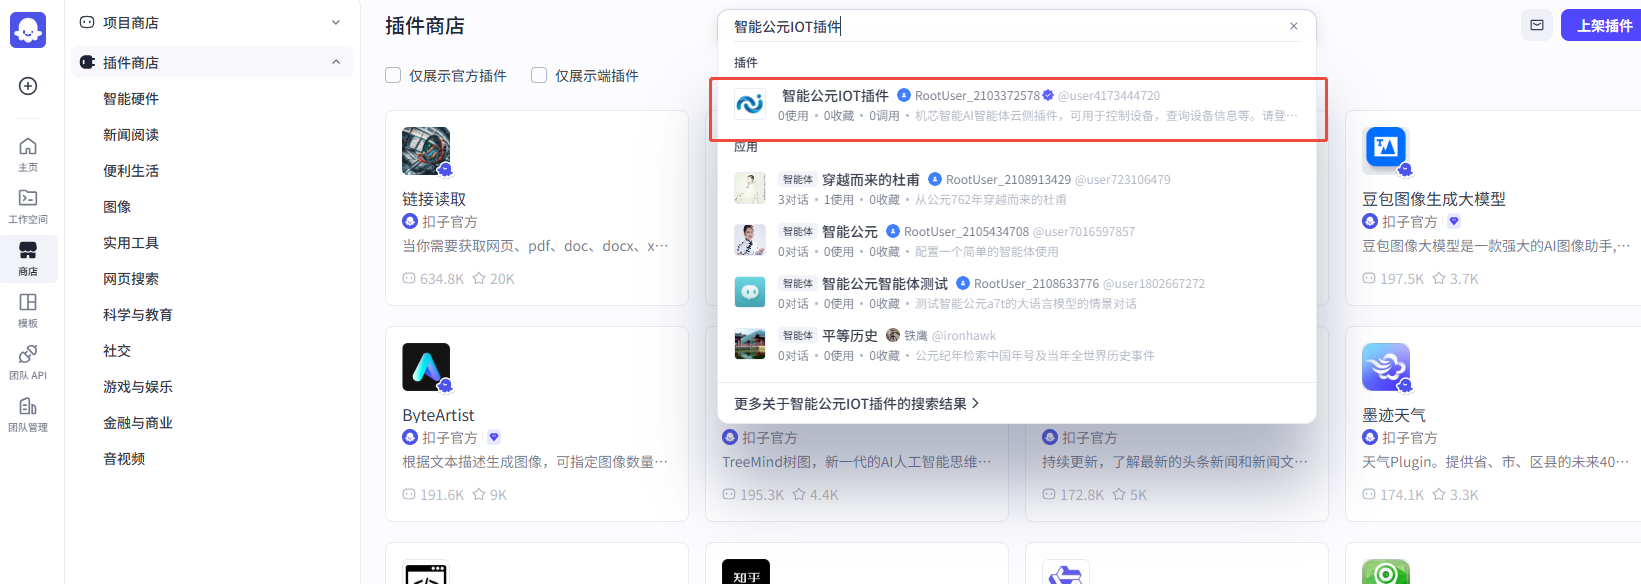
6. coze 插件对接
平台提供“智能公元 IOT 插件”示例,亦可按照以下流程制作自定义插件。
6.1 生成插件
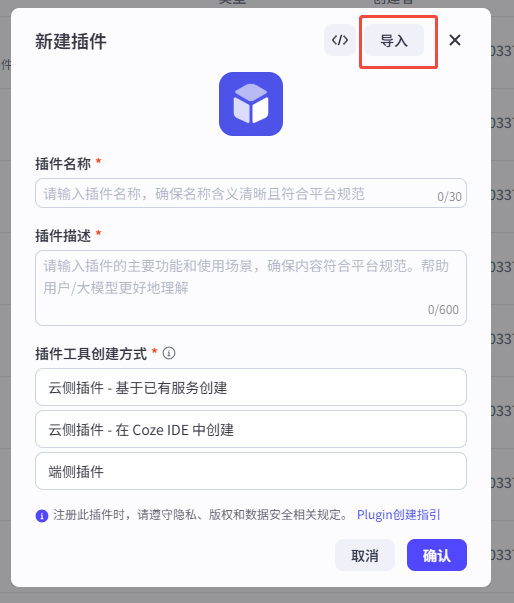
- 在版本详情页的 MCP 工具 菜单点击“预览”,在弹窗中选择“下载插件”,获取
mcp_tool.yaml。 - 登录 coze 平台,在“工作空间 → 资源库”选择“添加插件”。
- 在新建插件窗口点击右上角“导入”,上传
mcp_tool.yaml。 - 按向导点击“下一步”→“确认”。
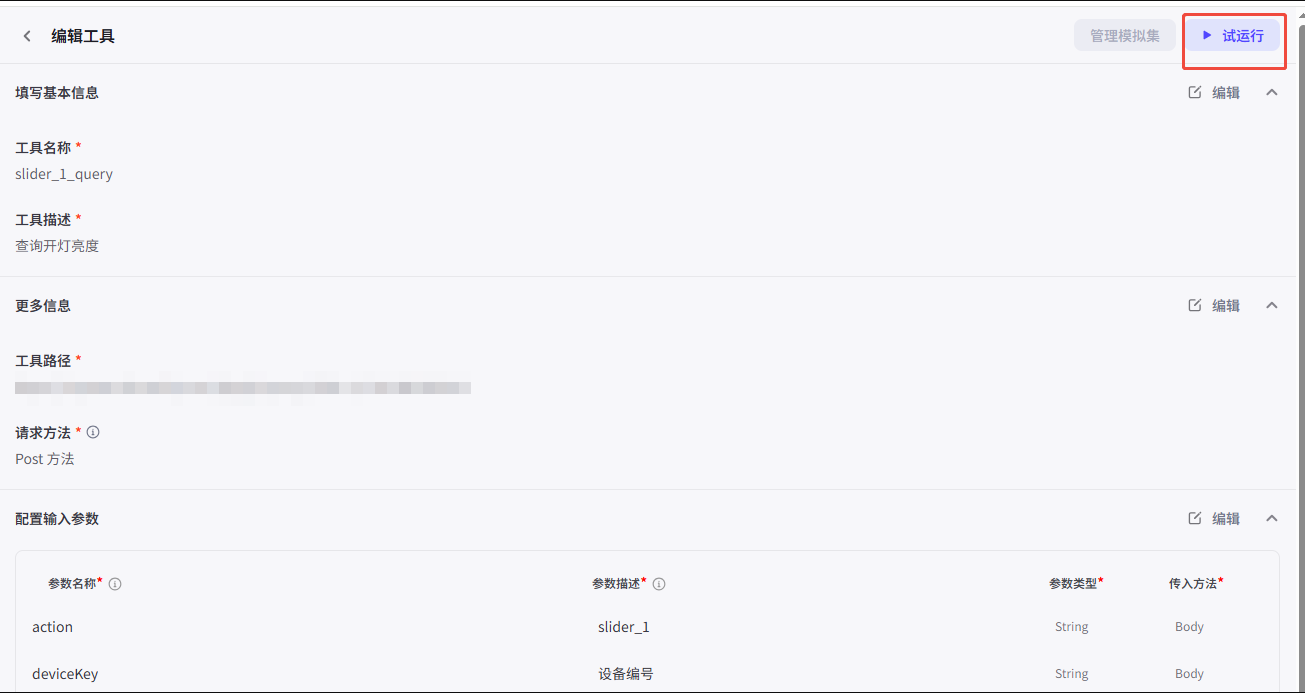
- 资源库中会出现新插件,进入后将所有工具设置为“启用”。
- 首次状态会显示“失败”,需要执行“试运行”并填写参数:
token固定为Bearer test,其余参数可按需填写,通过后状态变为“通过”。
6.2 配置对话流
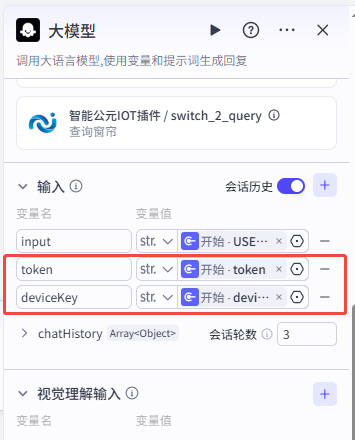
- 在对话流编辑器中,选中“开始”节点,新增输入变量
token与deviceKey。 - 选中大模型节点,关闭“深度思考”开关以缩短响应时延。
- 在“技能”栏添加刚导入的插件。
- 在“输入”栏引用“开始”节点的
token、deviceKey变量。 - 在“用户提示词”中也引用上述变量,确保大模型能正确传参。
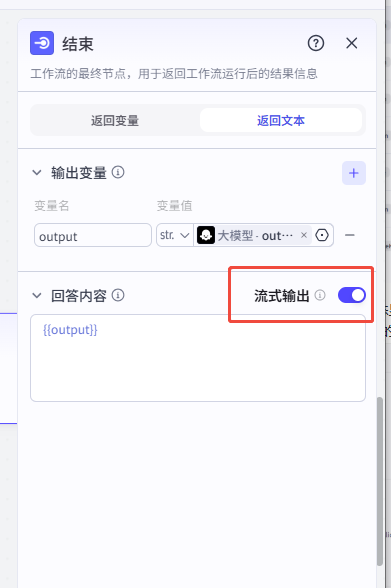
- 在结束节点开启“流式输出”。
- 发布对话流,即可在 coze 对话中调用插件。
6.3 配图参考
- 插件检索:
- 下载配置:
- 导入向导:
- 试运行:
- 对话流配置:
- 发布前检查:
通过以上结构化指南,可以在平台内快速完成智能体 API 接入、语音/文本对话调试,以及设备控制与生态插件的落地。